firebase 사용이유
어떤 아이디어가 있을 때 빠르게 프로토타입을 만들고 싶을 때 이용한다면
realtime database를 이용 할 수 있고 구글로 로그인하기 페이스북으로 로그인하기 휴대폰인증 알림 보내기 등
백엔드에서 구현을 하게 된다면 많은 시간을 투자해야 하는 기능을 firebase를 이용하게 된다면 정말 빠른시간안에 구현을 할 수 있도록
도와주는 것입니다
필수 요소
우선 firebase를 사용할 수 있는 최소의 조건을 봅시다
-Admin Node.js SDK — Node.js 12 이상
-Admin 자바 SDK — 자바 7 이상(자바 8 이상 권장) 자바 7은 지원 중단되었습니다.
-Admin Python SDK — Python 3.6 이상
-Admin Go SDK — Go 1.15 이상Admin
-.NET SDK — .NET Framework 4.6.1 이상 또는 .NET Standard 2.0(.Net Core 2.0 이상용)
- firebase 프로젝트
https://console.firebase.google.com/
로그인 - Google 계정
하나의 계정으로 모든 Google 서비스를 Google 계정으로 로그인
accounts.google.com
- 사용자 인증 정보가 포함된 비공개 키 발급

프로젝트 설정 > 서비스 계정 > 자바 선택 > 새 비공개키 발급
그리고 의존성을 추가해 줍니다!
-gradle
dependencies {
  implementation 'com.google.firebase:firebase-admin:8.1.0'
}
-maven
<dependency>
  <groupId>com.google.firebase</groupId>
  <artifactId>firebase-admin</artifactId>
  <version>8.1.0</version>
</dependency>
이제 firebase에 대한 초기화 코드를 작성하겠습니다
import com.google.auth.oauth2.GoogleCredentials;
import com.google.firebase.FirebaseApp;
import com.google.firebase.FirebaseOptions;
import org.springframework.context.annotation.Configuration;

import javax.annotation.PostConstruct;
import java.io.FileInputStream;
import java.io.IOException;

@Configuration
public void init()  {
        try {
            FileInputStream serviceAccountFile = new FileInputStream("src/main/resources/serviceAccount-File.json");
            FirebaseOptions options = FirebaseOptions
                    .builder()
                    .setCredentials(GoogleCredentials.fromStream(serviceAccountFile))
                    .setDatabaseUrl("https://example-ac805.firebaseio.com")
                    .build();

            FirebaseApp.initializeApp(options);
        }catch (Exception e){
            e.printStackTrace();
        }
    }
}
초기화를 했으니 이제 서비스를 생성해봅니다
import com.example.blog.domain.Phone;
import com.google.api.core.ApiFuture;
import com.google.cloud.firestore.Firestore;
import com.google.cloud.firestore.WriteResult;
import com.google.firebase.cloud.FirestoreClient;
import org.springframework.stereotype.Service;

import java.util.concurrent.ExecutionException;

@Service
public class PhoneService {
    public static final String COL_NAME = "phone";

    public String savePhoneInfo(Phone phone) throws ExecutionException, InterruptedException {
        Firestore dbFireStore = FirestoreClient.getFirestore();
        ApiFuture<WriteResult> collectionsApiFuture =
                dbFireStore.collection(COL_NAME).document(phone.getPhoneName()).set(phone);
        return collectionsApiFuture.get().getUpdateTime().toString();
    }
}
데이터를 저장하고 저장된 시간을 스트링으로 보내주는 코드입니다 !
서비스 까지만 생성하고 일단 테스트 코드를 작성해보겠습니다
import com.example.blog.domain.Phone;
import org.junit.jupiter.api.Test;
import org.springframework.beans.factory.annotation.Autowired;
import org.springframework.boot.test.context.SpringBootTest;

import java.util.concurrent.ExecutionException;

import static org.junit.jupiter.api.Assertions.*;

@SpringBootTest
class PhoneServiceTest {

    @Autowired
    private PhoneService phoneService;

    @Test
    public void saveAndGetPhoneInfo() throws ExecutionException, InterruptedException {
        Phone phone = new Phone("123123", "samsung", "sk");
        String result = phoneService.savePhoneInfo(phone);
        System.out.println(result);
    }

    //결과: 2022-05-06T11:25:40.835836000Z
결과는 잘 나오고 저장이 잘 되어있는지 확인을 해봅시다
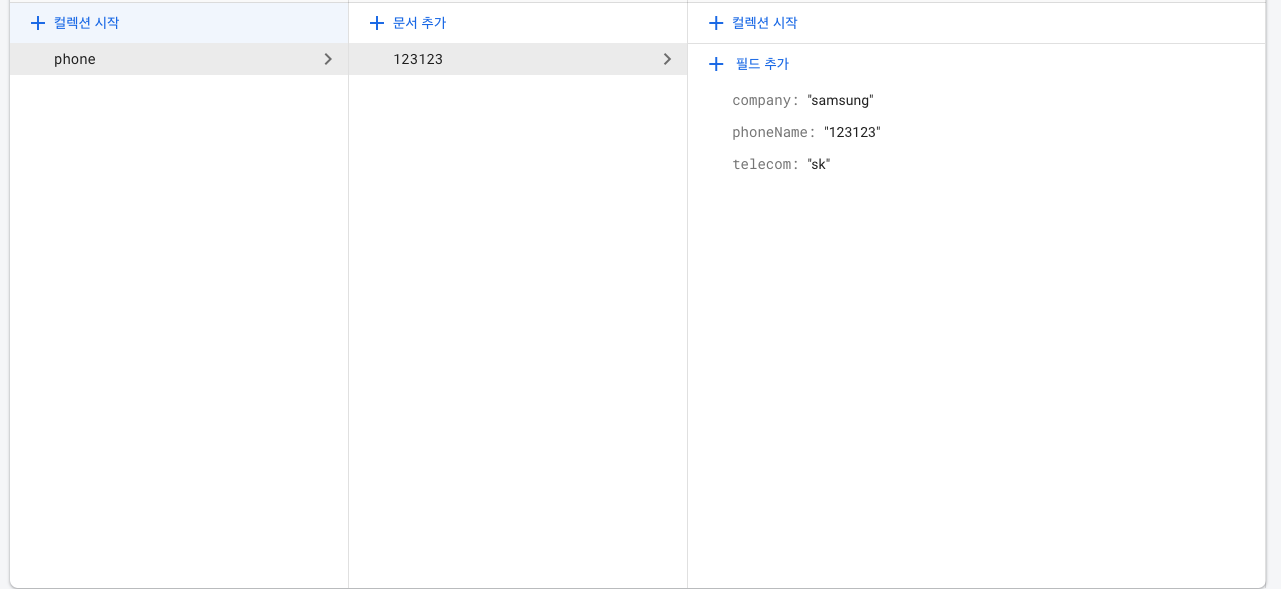
데이터가 잘 들어갔네요!!
이제 CURD중 C를 통과했습니다 다음글에는 R을 해보겠습니다 !!
'spring(스프링)' 카테고리의 다른 글
| spring scheduler 사용하기 (0) | 2022.05.26 |
|---|---|
| spring boot + FCM push하는 방법 (0) | 2022.05.11 |
| spring boot와 firebase 연결 방법 (2) (0) | 2022.05.07 |
| Querydsl 사용하기 (spring boot,maven) (2) | 2022.05.04 |
| 네이버 영화 검색 오픈 api 사용 방법(with spring) (0) | 2022.05.02 |


